Thursday 25 May 2017

Something just a little different...

Hello everyone and thanks for dropping in here. Today I have something just a little different to share...
Ok, so I admit it is yet another little journal, made with the Eileen Hull Journal die, but this one has my own lettering designs inside. I am always a bit reluctant to share these, as I am still right at the beginning of my lettering journey, but it's all about the journey right, and not perfection, so here goes.

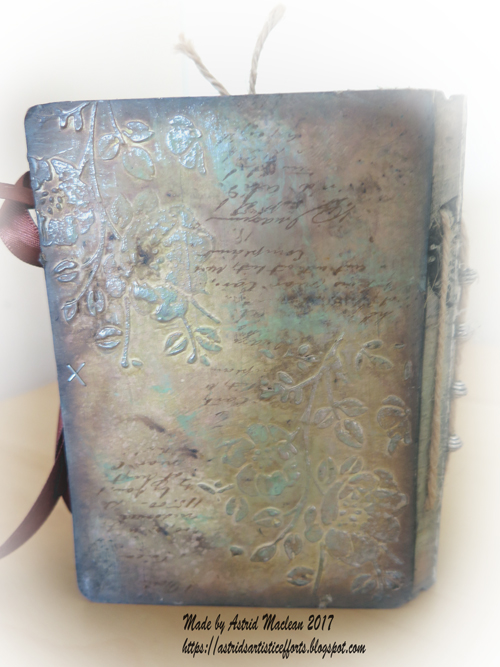
The outside was made with some pretty Prima papers from the Wild and Free collection. As this journal is all about hand lettering I made sure some of the gorgeous vintage lettering was showing, just for inspiration.
The closure is just elastic, no penholder this time, as I am using lots of different pens in here. I added some Distress Crazing medium as well for some crackle effect.
Here you can see the crackle a little better, I inked over it and then wiped away the excess with a baby wipe, so the ink would just go into the cracks.
Here is the spine, I used some slightly elasticated ribbon to hold the inserts inside. It's just stretchy enough for them to slip under.
Here you can see what it looks like from the inside. More pretty lettering on those papers, - it's only when you start to practise lettering yourself that you really appreciate what those lettering artists of the pastachieved, - no digi programmes then, it must all have been done with pen and ink.....
Ok, now to the inserts:
Here is the first one, practising drawing banners.
A few slightly more complex banners, patterns,  and a page of drills. I do loads and loads of those almost every day, it's the only way to get better....
Yet more banners and practising words, mistakes and all I'm afraid.
And finally I share some lettering designs, all of these were copied from things I found on Pinterest mostly. They take ages to do, but I love doing them....
On the left some encouraging words for myself to keep going, and on the right playing with different ways to write a date. Below still a few lettered quotes.
Lesson to learn here, - don't write on too thin paper, it bubbles...... duh
Here I was experimenting with using pencils rather than markers to colour my design. The original was a chalkboard design.
And here the final one, coloured with a mix of Tombow Brush pens, coloured pencils and a white gelli roll pen.

Lastly, if any of you are Eileen Hull's journal die lovers, there is an awesome Facebook group that you can join, here is a link: Journal Lovers Fanclub

Well that's it for today, thanks for your visit and I hope you will find something creative time.
xxxxx

Monday 22 May 2017

Passport to Paris and some journal freebies

Hello lovely visitors, welcome. Today I am sharing a little passport sized notebook created with the Eileen Hull passport die over on the Shimmerz blog, so just a little preview here. You can find the rest of it HERE

I have also designed a number of freebies, for those of you who like to create little books like this. 
The first two sets of two double pages are sized to be printed on A4 or 8.5 by 11 papers and fit Eileen Hull's passport die exactly they are 6.5 by 4.75" per double page,


 This next set is sized to fit the Midori sized travel journal as inserts, they are 21 cm by 21 cm (8.25 by 8.25 approx) I would suggest if you print these pages set your printer setting to landscape orientation. It might be wise to open them in a photo editing programme first and to make sure they are down loaded to the right size, if not just resize them to the correct size and they should print correctly. The size is just right to create inserts for the Eileen Hull Journal die


Well, that's it for now, and if you want to see how I used some of these in my little journal, just click here
Thanks for your visit like always
xxxxx

Tuesday 16 May 2017

Fun with friends and a little book again

Hello all, thanks for dropping by here. Today I am sharing a little book created with Eileen Hull's passport die.
A few days ago I had some friends over for an afternoon of crafty fun and we all made one of these (well we did not finish them), but we made a good start and I have now completed mine.
Here's a photo of us all around our table
From left to right: Rita, Jennie, me and Annie
We had so much fun and decorated our covers with texture paste and paints, Infusions, Oxide inks, stamping and so on. It's always so inspiring to see how different people create such different things all using the same stash.
Below is the spine, I used twine to sew my signatures and threaded the middle one with some beads for decoration.
Mine turned out quite fat as I created 3 inserts, using coffee dyed papers, some Tim Holtz and Prima papers as well as some digital print outs I had prepared for us all in the right size. I'll be sharing some of these as freebies in days to come, so stay tuned :).
Here is the back of mine, I left it quite plain, while adding a few embellishments to the front:
The saying is made with a stamp from a set by another Scottish friend, who sadly could not be with us, - Lynne Moncrief from Adorn. Annie had very kindly brought this stamp set along and I think we all used it in places.

As I made 3 little inserts, each with about 5 double pages'  I'll only show you a few of the pages, maybe I'll share a few more at some other point, - here goes:

Here you can see how I tucked the ribbon for the closure under a couple of little punch outs.
A page with a pocket and a little tag, - it's all in junk journal style again, which at the moment is my favourite style for making these little books and journals.
Here is the little tag that fits inside the pocket, another space for a quote or some journaling.
Some subtle stencilling and a coffee dyed page.

I sewed the signatures together with twine, that I also then pulled through to the cover as you might be able to see from one of the photos above. I left it all quite plain, so things can be added at some later stage. I am probably going to use this for some of my favourite hand written quotes.


Well, that's it for now, thanks for your visit like always and see you next time, have a good week!
xxxxx


Wednesday 10 May 2017

A grungy cover for my writing practice

Hello friends, today I have another journal cover to share, created with the fabulous Eileen Hull journal die. This one has turned out very grungy, unlike my more feminine Japan travel journal
I love this die, it is the perfect size to hold my midori style inserts that I love creating, and this one will hold the inserts in which I practice my brushpen calligraphy.
Here you can see how the cover came together,sand texture through various stencils and then loads of layers of paint, a mix of Paper Artsy Frescos and Distress Paints. I wanted to create a sort of worn leather look with a touch of rust and patina
Some writing related embellishments made with some Sizzix Mover and Shaper dies, and of course a pen nib for good measure.
And here the finished cover with a couple of home made inserts inside. I created a holder for my brush pen, that also forms the closure for the journal. It is based on an idea I saw online on the new Prima travel journals.
My pen holder is made out of 3 layers of Tim Holtz Grunge Board that I glued together and threaded the elastic through. No doubt leather would have been better, but I don't have any and this works perfectly as a closure and I think will stand up to quite a bit of wear and tear.

A couple of close ups of my embellishments and  the spine. I strung some beads through one of the elastics and also added a charm.

Below I will also show you some of the pages of my inserts. I have done them junk journal style again, and included many lined pages printed on super smooth paper for my writing practice.
I added lots of tuck spots and pretty tags here and there. I do most of my practice on loose drill sheets, but for a change it will be much more fun the write some quotes and sayings on decorated pages. This way I can also look back on how I improve...


This tuck spot/side pocket holds not only some tags, but also a separate booklet for further practice.
I love these junk journal style inserts, they are not only fun to do, but also are the perfect way to use up all those scraps we all hoard away, and I just love the size of these, - large enough to actually use, yet small enough to carry around.

Finally, I don't very often play in challenges anymore, but decided to link this to Art Journal Journey where the theme this month is Elegance and Grunge.

Before signing off, I just want to say a huge big thank you to my friend Anne for sending me the die cuts for this cover, while I wait for my own die to arrive. Thank you so much Anne, you are the best!!!

Well that's it for today, - thank you for your visit and have a great week.
xxxxx

Monday 8 May 2017

Three of My Favourite things, a project for Shimmerz

Hello lovely visitors, thanks for dropping by. Today I have a project over on the Shimmerz blog, so just a little snippet here:
If you want to know what those three favourites are right now, well, just click HERE.
Meanwhile, thanks you for your visit and see you next time
xxxxx

Related Posts Plugin for WordPress, Blogger...

One World One Heart

Photo

FEEDJIT Live Traffic Feed

Birthday Card

Birthday Card
Just got a whole lot of new stamps from a brilliant place called the Stamp Smith. This is the image that I first saw on Docraft and really liked. I asked the friend who has used it in an ATC, where she got it. Well she borrowed it from a friend who got it from ebay as a one off. But.... it had a title. I googled the title, and hey presto found the site. They have great stamps and offer a really friendly fast service. I highly recommend them!

Gothic Arch Trifold inside

Gothic Arch Trifold inside

Back of Gothic Arch Trifold

Back of Gothic Arch Trifold

Gothic Arch Within the Heart

Gothic Arch Within the Heart

Gothic Arch, the Key

Gothic Arch, the Key